Introduction
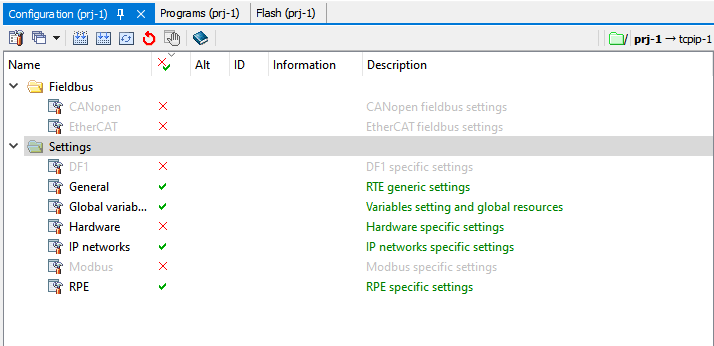
The settings used by RTE can be changed through the project configurator, under the "Settings" folder.
NOTE: In the chapter RTE: Base Project, there is the procedure to follow for creating the project configurator.
Bookmarks
General Settings
From "Project Configurator" -> "Settings" -> "General" you can configure the general settings used.
NOTE: Once the correct configuration is set, right-click from project configurator -> "Generate" -> "RTE configuration only" to generate the updated RTE.CFG file, which will be placed inside the Compact flash/SD of the control in use after a make/rebuild operation.
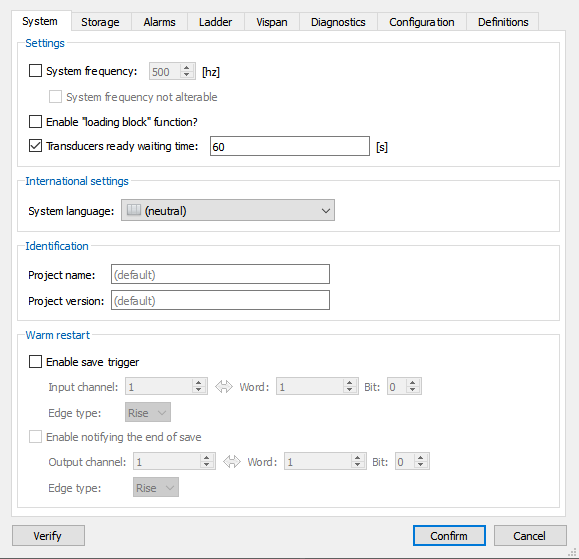
System: "System frequency" and "System frequency not alterable"
Project Configurator -> Settings -> General -> System.
The "System frequency" and "System frequency not alterable" flags are used to manage the frequency of the rules. There are two ways to set the execution frequency (interrupt) of the RULES task:
•In cases where canbus and/or EtherCAT networks are managed, the frequency of rule execution must be multiple (equal to or greater than) the SYNC transmission frequency. In such cases, the frequency of rules is set in the respective fieldbus configuration editors. If you are running a canbus network, it is imposed by "system frequency", if you are using an EtherCAT line, it is set by "cycle time." If you are running both networks, this frequency must be the same in both editors
NOTE: In case the frequency has already been set in the canbus and/or EtherCAT networks configurator, the setting from project configurator is ignored and a warning is given in the report.
•If no fieldbuses are handled, frequency is imposed from project configurator
NOTE: The "System frequency not alterable" flag is no longer used, and will be removed in later versions of RDE.
Example
Using an EtherCAT line with a cycle time set to 4000us (250Hz), while from the project configurator a system frequency of 200Hz is imposed. Using the shell command mreport -a, I get these two reports: OS -0x00000010 < 10.856418> [ 26] 'ECAT(ETH1): System Frequency (250Hz) needed by <ETH1> is accepted by the system RTE-0x00000019 < 11.560471> [ 81] 'Unable to satisfy SYS_FREQ <200> because a fix frequence (250) has been set before!' |
System: Enable loading block function
Project configurator -> Settings -> General -> System.
From RTE 33.11.6.
At system switch on, if the performance is enabled, there is a 5 seconds phase during which the possibility is given to the programmer to disable RAM loading of programs.
To do this, the programmer must press the ADV button when LED 7 and LED 8, after the boot phase, begin to flash alternately at a frequency of 4 Hz.
Successful pressing of the ADV button within the 5 seconds is signaled by RTE by synchronous flashing of LED 7 and LED 8 at 4 Hz for one second.
Should the loading of some task create general problems immediately after the boot phase, by taking advantage of this performance it will be possible to load from the shell one task at a time thus discriminating the task.
System: Transducers ready waiting time
Project Configurator -> Settings -> General -> System.
Allows you to set the maximum time the control must wait before the connected transducers are ready.
If the TAM transducer alarm is enabled and, in the specified time, the control does not find the transducers ready, alarm "21#nn Transducer is NOT yet ready" is generated.
System: System language
Project Configurator -> Settings -> General -> System.
Allows you to set the language of alarms generated by RTE.
At switch on, RTE searches the CF for the presence of alarm files related to the selected language.
NOTE: From RTE 34.23.0 it is possible to select the system language through the LANGUAGE variable.
These files are the system alarm files (contained in etc/rte/alsys), and the user alarm files. They must be present on the CF.
Through project configurator it is possible to specify both the language and the relative path to the text files on the PC (see Alarms: user files below).
NOTE: This keyword can be overridden by the presence of the override.cfg file present on the CF.
System: Project Name and Project Version.
Project Configurator -> Settings -> General -> System.
From RTE 34.24.0.
Allows writing the software version of the application to the memory area that is displayed by the "SYSINFO" command (to be sent from shell) and 4*20 viewers.
Equivalent to using the set_version instruction from R3.
System: Warm Restart
Project Configurator -> Settings -> General -> System.
From RTE 34.29.0.
Enables the warm restart feature by specifying an input channel that causes the data save to start and an optional output that is triggered at the end of the save operations.
Storage
Design Configurator -> Settings -> General -> Storage.
In "Settings" you can change the number of volatile registers (integer R, real RR, string SR) used by RTE, the user area of retentive memory present in the control, and the retentive area reserved for persistent global variables.
NOTE: The limit for non-retentive user-defined units (R, RR, SR) is given by the amount of ram memory available.
In "Retentiveness," some of the predefined variables can be returned volatile (see retentive memory for more information).
Alarms: Settings
Project Configurator -> Settings -> General -> Alarms.
In "Settings -> Alarm History" you can set the maximum number of alarms that can be saved in the alarm history and the number of repetitions of the same alarm to be saved.
If "automatic" is imposed, the maximum available is taken (the maximum number of saved alarms depends on the retentive memory configuration).
In case the requested number of alarms to be saved is greater than the available number, the number of saved alarms is reduced and is reported in the report.
Example
I set 2048 alarms to be saved in the history, but I only have memory available for 1534 Using the shell command mreport -a, I get: RTE-0x000026 < 12.591285> [ 41] 'BEWARE! Alarm History : too many items required(2048), reduced to 1534 items' |
In "Settings -> miscellaneous" you can select the mode of emergency alarms:
•OFF: disabled generation of emcy related alarms
•COMPACT: generic alarm information (alarms used will be 19 and 81)
•EXTENDED (default): in addition alarms 30 to 39 are generated. Select this mode if the type of drive used is present in the list of managed drives (axis-->transducer project configurator, see axis management)
Also in "Settings -> miscellaneous" you can enable or disable the use of alarms with Alarm par prominent and the use of user strings in alarms.
Alarms: Alarms file
Project Configurator -> Settings -> General -> Alarms.
In "Alarms Files" you can indicate the location of the text files used for system alarms and user alarms.
You can select one text file for system alarms and one text file for user alarms, for each of these languages: Italian, English, German, French, Spanish, Portuguese, Russian, Korean, Dutch and Simplified Chinese.
The text file used depends on the system language selected (see System Language above). In the case where no language is selected, the text file used will be the one selected as "neutral".
These files will then have to be copied inside the CF/SD of the control, to the selected folder.
Ladder
Project Configurator -> Settings -> General -> Ladder.
Allows you to choose if you want to start ladder tasks automatically:
•Not selected: ladder tasks are executed only on explicit command from directive or when control is put in run mode
•Selected: ladder tasks are executed immediately after being loaded
Vispan
Project Configurator -> Settings -> General -> Vispan.
In the "Vispan" window, the operations that can be performed via Dispan/Vispan are imposed in relation to the password level.
In addition to the default level, which does not need a password, three additional levels of protection are manageable.
Diagnostics
Project Configurator -> Settings -> General -> Diagnostics.
The checkmark "Enable power on diagnostics" enables/disables the generation of warning at switch on of the control (alarm "9991 SYSTEM SWITCHED ON <name>").
The "Enable power off diagnostics" checkmark enables/disables the generation of warning when the control is turned off (alarm "991 SYSTEM SWITCHED OFF in <name>").
In "Report Settings," you can define the number of items that can be stored in the report, either by the RTE firmware or by the OS.
From RTE 34.22.2, the checkmark "To fill" enables storage of report entries (both RTE and OS) in fill mode, instead of the default round-up mode:
•Round-up: once the storable entries are finished, the new entries replace the older ones
•Fill mode: once the storable entries are finished, no new ones are stored
Hardware settings
From "Project Configurator -> Settings -> Hardware" you can configure the type of control you are using.
NOTE: Once the correct configuration is set, right-click from project configurator -> "Generate" -> "Hardware configuration only" to generate the updated RHW.CFG file, which will be placed inside the Compact flash/SD of the control in use after a make/rebuild operation.
Some settings in the "hardware" window may also change the RTE.CFG file, so it is recommended to regenerate the RTE configuration as well (or if in doubt use "Generate All").
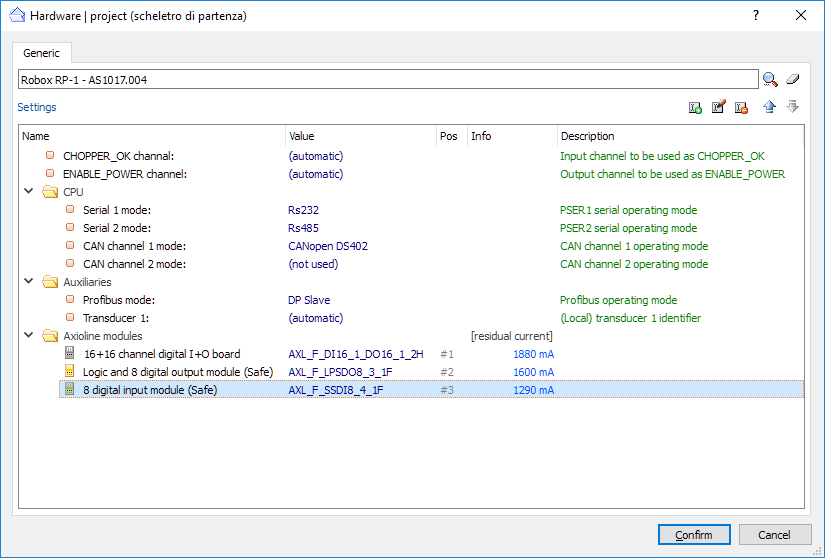
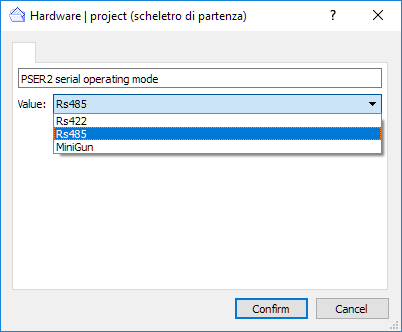
Also from this window, the mode of use of the ports provided by the control must be set (just double-click on the desired line).
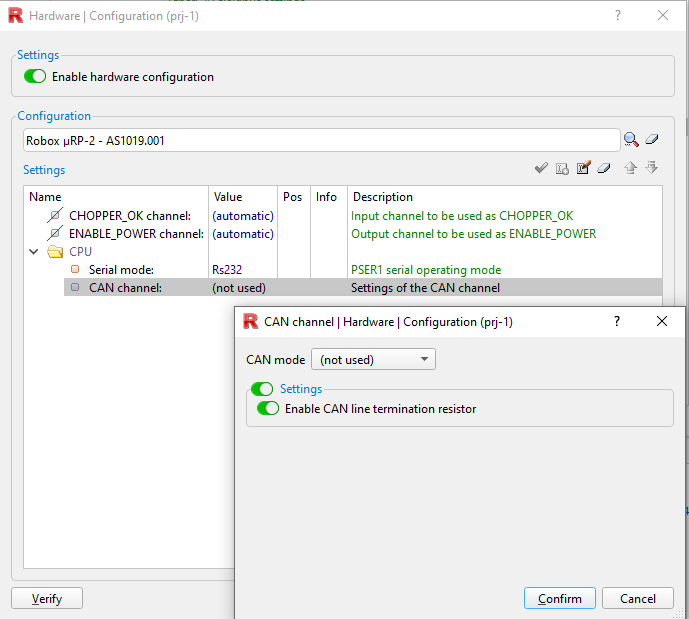
From RTE 34.30.7 it is possible, by selecting a control from the AS1019 family (µRP-2, ..), to configure the presence of the termination resistor, internal to the control, of the CAN line. In the RHW.CFG file you will have:
CAN_TERM ch status , where ch is the CAN channel number and status can take the values ON/OFF/unused.
In addition, for RP-X controls, any axioline modules connected to the control via axiobus must be added.
NOTE: See the axioline chapter for more information regarding the configuration of axioline modules connected to the control. See the SAFETY chapter for more information regarding the configuration of Axioline SAFETY modules connected to the control.
IP networks settings
From "Project Configurator -> Settings -> IP Networks" you can enter the network configuration used.
NOTE: Once the correct configuration is set, right-click from project configurator -> "Generate" -> "IP Networks configuration only" to generate the updated IPADDR.DEF or NETWORK.CFG file, which will be placed inside the Compact flash/SD of the control in use after a make/rebuild operation.
Some settings in the "IP Networks" window may also change the RTE.CFG file, so it is recommended to regenerate the RTE configuration as well (or if in doubt use "Generate All").
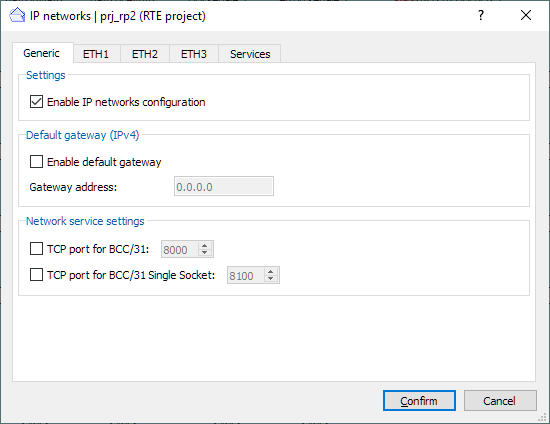
General
Project Configurator -> Settings -> IP Networks-> General.
In "General" you can enable the configuration of IP networks, set a default gateway, and select the TCP port for BCC/31 communication with the control.
NOTE: If you use TCP port with single socket (recommended), a single socket will be opened for data exchange in BCC via the selected port, instead of opening a socket for each connection.
ETH1, ETH2, ETH3
Project Configurator -> Settings -> IP Networks-> ETH1, ETH2, ETH3.
In ETH1, ETH2 and ETH3 you can set IP address, subnet mask and gateway of the individual Ethernet ports of the control. You can also set the internal routing between the Ethernet ports.
Advanced services
Project Configurator -> Settings -> IP Networks-> Services.
From RDE 3.53.1 you can enable advanced configuration of IP networks, made specifically for NetControl.
For more information on advanced configuration of IP networks, see the NETCONTROL chapter.