The Ethernet over EtherCAT (EoE) protocol allows tunneling of standard Ethernet (e.g., TCP/IP) packets over an EtherCAT network.
It allows you to establish a connection between your PC and an EtherCAT slave device that supports the EoE protocol.
IP address management criteria
Let us take as an example the case where an EtherCAT network has been configured on the ETH1 port of the Robox control. While the ETH2 port is configured to communicate in TCP/IP. Assume that we want to create an EoE network whose IP addresses range from 192.168.19.0 to 192.168.19.255. The following image is an example of how to configure the IP addresses, Subnet masks, and Gateways of the devices:
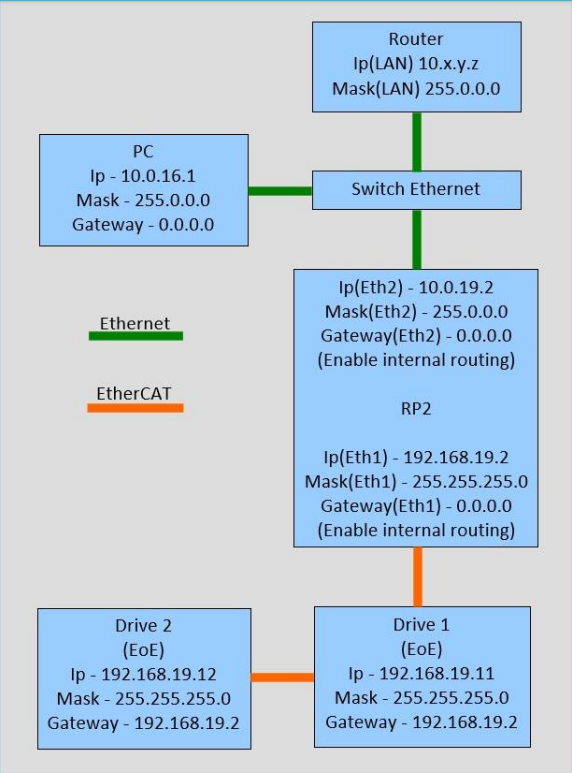
Configuring the ports of the Robox control
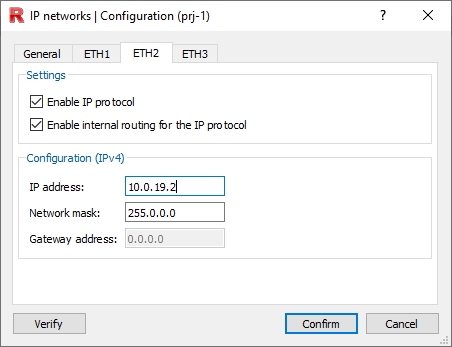
The ETH2 port must be configured to be on the same IP network as the PC and eventually the router (in this example, the network is 10.x.y.z), and internal routing must also be enabled (see image below):
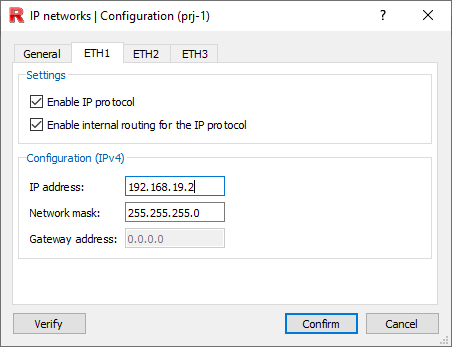
The ETH1 port must be configured to be on the same IP network as all other EoE devices (in this example, the EoE network is 192.168.19.x), and internal routing must also be enabled (see image below):
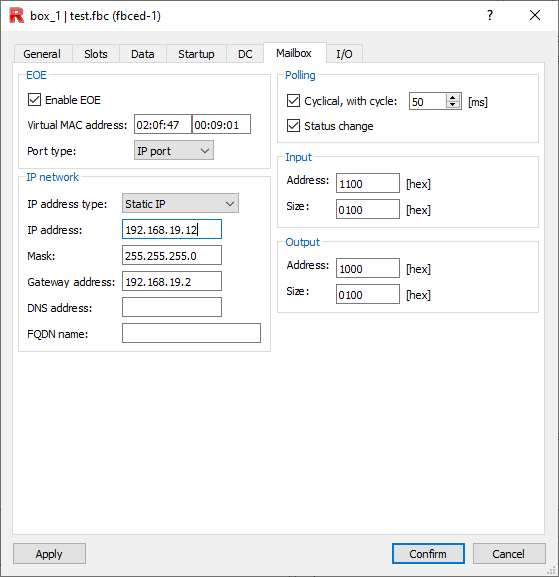
EtherCAT network configuration
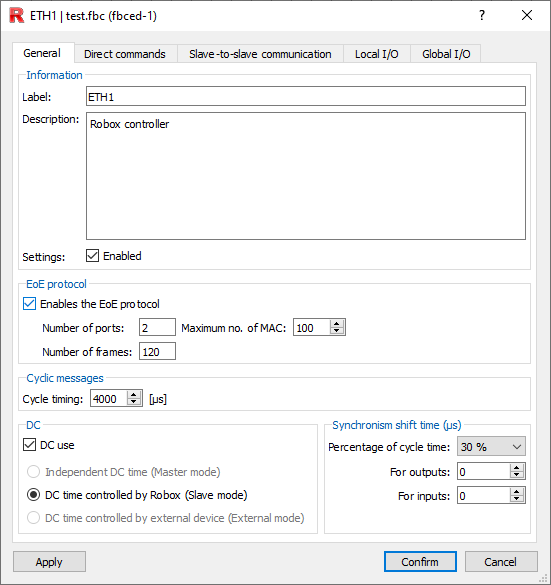
Open the EtherCAT network editor, double-click on the EtherCAT master to open its configuration window. Check "Enable EoE protocol."
Double click on an EtherCAT Slave device, in the "Mailbox" tab check "Enable EoE", in the "IP Address Type" field put "Static IP", enter the IP address you want to assign to the device and the Subnet mask to be in the same network as ETH1. As "Gateway address" put the ETH1 port address.
Configuration of the PC or equivalent device
All of the following operations, used in the example, refer to the Microsoft Windows operating system. These actions are intended to reach the subnet connected to the ETH1 port of the RP-2.
The port on your PC connected to the ETH2 port must be configured to be in the same network as ETH2 (in this example, 10.0.16.1 was assigned as the IP address).
Open the Windows command prompt (on some PCs you may need to run it as administrator), issue the command:
route add 192.168.19.0 mask 255.255.255.0 10.0.19.2
where:
route add |
Command to add a new rule in the PC routing table |
192.168.19.0 mask 255.255.255.0 |
Network you want to reach (in this case it is the EoE network) |
10.0.19.2 |
IP address to which to send Ethernet packets to reach the desired network (in this case it is the IP address of the ETH2 port) |
To be sure that the routing table has been configured correctly use the command:
route print
On the command prompt the routing table will be printed, if the operation was successful in your routing table you will find a line like the following:
IPv4 Route table
===========================================================================
Active routes:
Network Address Mask Gateway Interface Metric
---
192.168.19.0 255.255.255.0 10.0.19.2 10.0.19.1 36
---
===========================================================================
Under "Network Address" and "Mask" there must be the EoE network definition (192.168.19.0 / 255.255.255.0), under "Gateway" there must be the IP address of the ETH2 port (10.0.19.2) while under "Interface" there must be the IP address of the PC port configured to communicate with the control (10.0.19.1).